 Zhcloudlink
Home / Technology / Facial recognition camera Installation height, angle, and distance define
Technology
Facial recognition camera Installation height, angle, and distance define
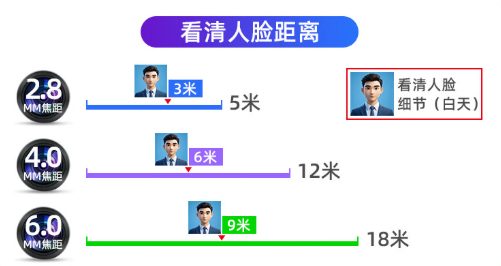
The 6mm lens paired with a 1/2.7 "–1/2.8" sensor is the most commonly used medium-to-long focal length combination in security and facial recognition applications. Its key advantage is that it provides an optimal balance between coverage width and recognition range.
I. Basic Lens Parameters
The 6mm lens paired with a 1/2.7 "–1/2.8" sensor is the most commonly used medium-to-long focal length combination in security and facial recognition applications. Its key advantage is that it provides an optimal balance between coverage width and recognition range.
| parameter | numeric value |
| Horizontal Field of View (HFOV) | ~45° ~ 50° |
| Vertical Field of View (VFOV) | ~33° ~ 37° |
| Diagonal field of view | ~55° ~ 60° |
| Optimal face recognition distance | 3m ~ 8m |
| Maximum detectable distance | ~12 m (depending on lighting conditions and algorithm) |
| Minimum near object distance | ~0.5m |
Reference comparison:
· • 4mm → Suitable for close-range distances of 2–5 m; offers a wide field of view, but the facial feature pixels are relatively small.
· • 6mm → Suitable for medium range (3–8 m); a balanced choice (Recommendation: ⭐⭐⭐⭐⭐)
· • 8mm → Suitable for long-range distances of 5–12 m; narrow field of view
II. Quick Reference Table of Core Installation Parameters
| parameter | Recommended value |
| Installation height (distance from the lens center to the ground) | 2.2m ~ 2.5m |
| Recommended height (golden value) | 2.4m |
| Downward tilt | 10° ~ 15° |
| Horizontal deflection angle | 0° (directly facing the channel) or ≤20° (lateral) |
| Optimal recognition distance | 3m ~ 6m |
| Maximum effective recognition distance | ≤10m |
| Minimum pixel requirement for face detection | Eye spacing ≥60px / face width ≥120px |
| Environmental illuminance requirements | ≥300 lux (supplemental lighting recommended) |
III. Detailed Installation Height Guidelines
3.1 Scope and Rationale
Core principle: Position the face slightly below the center of the frame to minimize facial distortion caused by an overhead viewing angle. An excessively high mounting height can result in an overly steep angle, causing the camera to capture only the top of the head and the forehead; conversely, an excessively low mounting height may lead to obstructions or create a sense of pressure for pedestrians.
| altitude band | effect | appraise |
| < 2.0m | Prone to obstructing view, and can create a strong sense of pressure for pedestrians. | ❌ Not recommended |
| 2.2m | Primarily suitable for individuals with a height of 1.55–1.75 m. | ✅selectable |
| 2.4m | Suitable for heights from 1.55 m to 1.85 m; full coverage. | ✅✅the best |
| 2.5m ~ 2.8m | It offers wide coverage, but requires an increased俯角. | ⚠ A downward viewing angle of ≥15° is required. |
| > 3.0m | Significant facial deformities were observed, leading to a sharp decline in recognition accuracy. | ❌ Not recommended |
3.2 Scenario Adaptation Recommendations
· • High proportion of children (height 1.2–1.4 m) → appropriately reduce to 2.0–2.2 m
· • Primarily adult males (1.7–1.85 m) → Recommended height: 2.4–2.6 m
· • Mixed population → Suitable for all users up to 2.4 m
3.3 Quick Calculation Formula
Installation height ≈ average height of the target population × 0.88 + safety margin
Example: Average height of 1.70 m → 1.70 × 0.88 + 0.5 ≈ 2.0 m (on the lower end)
After optimization, the recommended range is 2.2–2.4 m, ensuring that the face of a person 1.85 m tall remains within two-thirds of the frame.
IV. Detailed Explanation of the Downward Angle (Inclination Angle)
4.1 Recommended俯角 for different scenarios
| scene | Recommended俯角 | explain |
| Standard channel (2.4 m high) | 10° ~ 12° | Optimal balance point |
| High installation height (2.8 m+) | 15° ~ 20° | Compensate for height difference |
| Low installation height (2.0 m) | 5° ~ 8° | Avoid excessive tilting of the face backward |
| Access Control/Turnstile (Stationary Recognition) | 0° ~ 5° | A person comes to a halt before the camera. |
4.2 Hazards of an Excessive Downward Angle (>20°)
When the俯角 exceeds 20°:1) Only the top of the head and the forehead can be captured, and the face is severely compressed; 2) Insufficient pixel coverage is observed in the region below the nose; 3) The facial pitch angle exceeds the algorithm's tolerance range (typically ±15°); 4) The recognition rate may drop from 98% to below 60%.
4.3 Quick Reference Mnemonic for Angle Adjustment
The camera lens is centered on the point on the target's face where it approaches, at a height of approximately 1.5 m above the ground.
operating steps:
1. 1. The camera is installed at a height of 2.4 m.
2. 2. The target is located at 4 m (the midpoint of the channel).
3. 3. Align the lens with this spatial point (4 m, 1.5 m)
4. 4. Calculate the inclination angle: arctan((2.4–1.5)/4) ≈ arctan(0.225) ≈ 12.7°
5. 5. Falls within the recommended range of 10°–15° ✅
V. Distance and Coverage Table
The following data are calculated based on a 1/2.8" sensor paired with a 6 mm lens (HFOV ≈ 47°):
| distance | Horizontal coverage width | Vertical coverage height | Face pixels | Identification Quality |
| 2m | ~1.7m | ~1.2m | Too large (exceeds the image area) | ❌ Too close |
| 3m | ~2.5m | ~1.8m | ~250px wide | ✅✅outstanding |
| 5m | ~4.2m | ~3.0m | ~150px wide | ✅good |
| 7m | ~5.8m | ~4.2m | ~110px | ⚠manage with an effort |
| 10m | ~8.3m | ~6.0m | ~75px | ❌flat |
| 12m | ~10m | ~7.2m | ~60px | ❌disabled |
Calculation formula: coverage width ≈ 2 × distance × tan(HFOV/2)
Example: For a 6 mm beam at a distance of 5 m → 2 × 5 × tan(23°) ≈ 2 × 5 × 0.425 ≈ 4.25 m
VI. Installation Scenario Classification Scheme
Scenario A: Passage/Corridor (unidirectional pedestrian flow)
The camera is installed on one side of the passageway, positioned to capture an overhead view of the incoming pedestrian flow. The installation height is 2.4 m, the俯角 is 12°, and the optimal capture point is set at 4–5 m.
· ✅ Recommended: Install on one side of the passageway, directly facing the flow of people approaching from that side.
· ✅ Capture distance setting: 4–5 m
Scenario B: Entrances/Exits / Main Gates
The camera shall be installed 3–4 m inside the door, directly facing the entrance direction. The installation height shall be 2.4 m, with a downward tilt angle of 12°. Avoid backlighting; if the main door faces outdoors, supplemental lighting or a wide dynamic range setting should be employed.
· ✅ Recommended: 3–4 m inside the gate, directly facing the entrance direction
· ⚠ Note: If the main door faces outdoors, supplemental lighting or wide dynamic range (WDR ≥ 120 dB) is required.
Scenario C: Turnstile/Time & Attendance Machine (Station Detection)
If the camera is positioned more than 3 m from the turnstile, a 6 mm focal length is appropriate, with the俯角 (tilt angle) controlled between 0–5°. If the distance to the turnstile is only 1–2 m, it is recommended to switch to a 4 mm lens.
VII. Common Pitfalls and How to Avoid Them
❌ Error 1: Installing it too high without adjusting the angle
Height: 3 m;俯角: 5° → Face located in the lower 1/4 of the frame → Severe distortion; low recognition rate
· ✅ Countermeasure: For every 0.1 m increase in height, the downward angle increases by 1°.
❌ Error 2: Backlight installation
Camera facing the door/window → entire face appears black
· ✅ Mitigation: Use side mounting or add fill lights, or opt for a camera with wide dynamic range (WDR 120dB+).
❌ Error 3: Incorrect determination of installation distance
I thought a 6mm lens could capture up to 20m → in reality, beyond 8m, only half of my face is visible.
· ✅ Mitigation: For 6mm lenses, the maximum capture distance shall not exceed 8–10 m.
❌ Error 4: Excessive horizontal deflection angle
Camera shot in a diagonal angle from the side of the passageway → face yaw> 45° → algorithm fails to recognize
· ✅ Countermeasure: Horizontal deflection ≤ 20°, not exceeding 30° at the farthest point
VIII. On-site Commissioning Steps (Practical Procedure)
Step 1: Secure the camera at a height of 2.4 m (tighten the support bracket)
Step 2: Stand at a distance of 3–5 m, then adjust the俯角 until your face occupies the upper third of the frame.
Step 3: On the platform, inspect the face detection bounding box: Is the bounding box stably enclosing the entire face? Is the detected face pixel width ≥ 120 px?
Step 4: When a person approaches from a distance, check the captured trigger point: the ideal trigger distance for the 6mm lens is set between 3–8 m.
Step 5: Test with different heights: 1.6 m / 1.7 m / 1.8 m (one trial per height)
Step 6: Adjust the fill light brightness (avoid overexposure or underexposure)
On-site Quick Verification Formulas
Given the installation height H, the downward angle θ, and the target distance D:
The horizontal position of the face in the frame ≈ H-D × tan(θ)
Example: H=2.4 m, θ=12°, D=4 m → 2.4 − 4×tan(12°) = 2.4 − 0.85 = 1.55 m
→ The camera captured the pedestrian at a height of 1.55 m, which precisely corresponds to the facial region ✅
Questions
What is the typical focal length (mm) of the lens used in facial recognition cameras?
Face recognition cameras typically use lenses with a focal length of 6mm, ensuring a capture distance of up to 15m and an effective range of 6-15m. If used for seamless attendance tracking in offices where the distance is relatively close, a face recognition camera with a 4mm lens is sufficient, guaranteeing an effective recognition distance of 4-8m.
What are the general requirements for the installation height of face recognition cameras?
The installation height of face recognition cameras is generally recommended to be between 2.5 meters and 3 meters. It should not be too high, as it may result in a downward angle, nor should it be too low, as it may cause obstruction, both of which will affect face detection and capture.